Category Archives: Arduino

Use one PWM signal channel to switch onboard FPV cameras and switch on and off recording.

This Arduino sketch will allow two buttons on an er9x radio control radio transmitter to be multiplexed into turning on and off any predefined state of pins on the Arduino. I used it to control recording, on and off, of the raspberry pi. This was allocated to one of the switches and the other to toggle around 4 cameras. This could be easily extended to more cameras though. The pins that are used can be wired up to a solid state analogue switch. such as,

MC74LVXT4066DTRG ANALOGUE SWITCH, QUAD, SPST, TSSOP-14

The code basically moves a walking bit from one pin to another enabling the CVBS signal from one camera signal at a time, to switch on and send the analogue CVBS signal to the onboard TV signal transmitter. This will then send the signal back to your receiver on the ground, where you can see a TV signal.

unsigned long duration;

int pin=A0;//This pin receives the signal from the receiver which is a 5v PWM signal
int ledPin = 13;//led to indicate recording.
int rec=0;//recored pin enable / disable

/*
Zones
The three ranges below create four zones. That is given the PWM signal can exceed the LOW_RANGE and HIGH_RANGE. These have been defined as constants as all radios and calibrations are different and you will need to tune yours. I have found the pulse width is stable enough to stay within these reliably with space for more in future. I have two switches on the radio transmitter. One is a toggle switch and one is a binary 2 state switch. I use the toggle switch to switch from camera to camera and the other to switch record on and off. When recording is enabled the width of the signal stays within zone 2 and 3 and when it is disabled zone 1 and 4. Then if there is a zone transition between 1 and 2 in record mode this will toggle the camera to the next and so on.
*/
//zone 1
const int LOW_RANGE   =1350;
//zone 2
const int MIDDLE_RANGE=1850;
//zone 3
const int HIGH_RANGE  =2350;
//zone 4

int chanTog=1;
void togChan() {//permits 4 states 0,1,2,3 then loops back to 0
if (chanTog > 1){
chanTog = 0;
} else {
chanTog=chanTog+1;
}

}

void setup()
{
Serial.begin(9600);
pinMode(ledPin,OUTPUT);//recording light only
pinMode(12,OUTPUT);//recording actual
//digital D7 needs to be low for ground.
//digitalWrite(7,LOW);

//digitalWrite(5,LOW);
//digitalWrite(6,LOW);
pinMode(2,OUTPUT);
pinMode(3,OUTPUT);
pinMode(4,OUTPUT);
pinMode(5,OUTPUT);
pinMode(6,OUTPUT);
pinMode(7,OUTPUT);
pinMode(8,OUTPUT);
pinMode(9,OUTPUT);

}//close setup

void loop()
{
duration = pulseIn(pin, HIGH);

//Debugging serial
Serial.print(rec,DEC);
Serial.print("\t");
Serial.print(chanTog,DEC);
Serial.println("");

//Camera switcher
 if ( chanTog == 3) {//These high and low states can be set arbitrarily.
 digitalWrite(2,LOW);
 digitalWrite(3,LOW);
 digitalWrite(4,LOW);
 digitalWrite(5,LOW);
 digitalWrite(6,HIGH);
 digitalWrite(7,LOW);
 digitalWrite(8,LOW);
 digitalWrite(9,LOW);
 }
 if ( chanTog == 2) {
 digitalWrite(2,LOW);
 digitalWrite(3,LOW);
 digitalWrite(4,LOW);
 digitalWrite(5,HIGH);
 digitalWrite(6,LOW);
 digitalWrite(7,LOW);
 digitalWrite(8,LOW);
 digitalWrite(9,LOW);
 }
 if ( chanTog == 1) {
 digitalWrite(2,LOW);
 digitalWrite(3,HIGH);
 digitalWrite(4,LOW);
 digitalWrite(5,LOW);
 digitalWrite(6,LOW);
 digitalWrite(7,LOW);
 digitalWrite(8,LOW);
 digitalWrite(9,LOW);
 }
 if ( chanTog == 0) {
 digitalWrite(2,HIGH);
 digitalWrite(3,LOW);
 digitalWrite(4,LOW);
 digitalWrite(5,LOW);
 digitalWrite(6,LOW);
 digitalWrite(7,LOW);
 digitalWrite(8,LOW);
 digitalWrite(9,LOW);

 /*  digitalWrite(2,HIGH);
 digitalWrite(3,HIGH);
 digitalWrite(4,HIGH);
 digitalWrite(5,HIGH);
 digitalWrite(6,HIGH);
 digitalWrite(7,HIGH);
 digitalWrite(8,HIGH);
 digitalWrite(9,HIGH);*/

 }

 if (duration >  MIDDLE_RANGE) { //enable record
   if( duration > HIGH_RANGE ) { //channel change
   togChan();
   delay(300);//debouncing noise delay. ms
   }
  rec=0;
  digitalWrite(ledPin,LOW);
  digitalWrite(12,LOW);
 } else {

   if(duration > LOW_RANGE ) {
   togChan();
   delay(300);
   }
 rec=1;
 digitalWrite(ledPin,HIGH);
 digitalWrite(12,HIGH);
 }

} //close loop

Heating control rcr10/433-GB RDJ10RF siemens

At the bottom of this post is the Arduino sketch you can use with the IRremote.h library. This library is used to send infrared light used on remote controls for television and video recorders and such. Interestingly the Siemens radio heating control uses the same encoding for its radio signal.

The structure of the radio signal is thus.

There are two sets of pulses. The first of the left is 32 bits is Infrared Sony encoded information. This is explained further here. The 32 + 32 bit data is sent 4 times in a row. I guess for redundancy and reliability. I found also if its only sent once it does not work. So 64 bits x 4 pulses are necessary.

http://www.righto.com/2010/03/understanding-sony-ir-remote-codes-lirc.html

the library IRremote does have an API sendSONY but I found it does not work for my purposes here, because the frequency passed in the library did not fit my frequency. So I used the SendRaw() function. I also defined my own one bit and zero bit and repeated them according to the array.

I have noticed the first set of 32 bits is always the same and it related to the second set. Its related in a way that is quite interesting. Its the original 32 bits but inverted (not gated).

I have found its inverted except for 2 bits. Bits 9 and 32. This bit inversion defines whether the signal being sent is on or off. You can see this from my code below.

To get this code working on your own heater. You probably will need to change the bits that are sent here and there. As they are all unique for “security” sake. There are also dip switched to change the identity. You can record the signal from your timer with a 433 Mhz receiver via your sound card. Then interpret the ones and zeros for off and put it in the heating_code_second array. This stores the off signal. Then the array inverts the necessary bits to make the signal on. The whole command for the Arduino code accepts a 1 for on and 0 for off over the serial link.

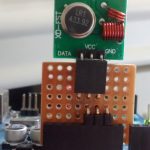
To interface the Arduino to the radio one needs a 433Mhz transmitter and  receiver pair. The receiver can be used to record the signal from the original siemens transmitter into audacity. Then run the sketch below to check it matches your out put.

IMG_20150218_142414073

/*
* IRremote: IRsendDemo - demonstrates sending IR codes with IRsend
* An IR LED/radio transmitter must be connected to Arduino PWM pin 3.
* Version 0.1 July, 2009
* Copyright 2009 Ken Shirriff
* http://arcfn.com
*/

#include <IRremote.h>

IRsend irsend;

// just added my own array for the raw signal
unsigned int digitalOne[4] = {0,820,370,0};
unsigned int radio_preamble_a[3] = {4800,820,0};
unsigned int radio_preamble_b[3] = {4800,0,0};
unsigned int digitalZero[4] = {0,200,370,0};
//off
unsigned int heating_code_first[33];
const unsigned int heating_code_second[33] =
{1,0,0,1,0,1,0,1,0,1,0,0,1,1,1,1,0,0,0,0,0,0,0,0,1,0,0,0,0,0,0,0,0};
String inputString = "";         // a string to hold incoming data
boolean stringComplete = false;  // whether the string is completevoid 
setup() {
Serial.begin(9600);
}

void loop() {// altered the code just to send/test my raw code
 if (stringComplete) {
 Serial.println(inputString);
 // clear the string:
 unsigned int input_num = inputString.toInt();
 inputString = "";
 stringComplete = false;
 unsigned int i=0;
 for (i=0;i < 33;i++) {
 heating_code_first[i] = heating_code_second[i];
 }
 if (input_num == 1) {//heating off
 //Serial.write("Heating on bit inversion");
 if (heating_code_first[32] == 0) {
 heating_code_first[32] =1;
 } else {
 heating_code_first[32] =0;
 } 
  if (heating_code_first[9] == 0) {
  heating_code_first[9] =1;
  } else {
  heating_code_first[9] =0;
  }
 }
 unsigned int pulse_count=0;
 for (pulse_count=0;pulse_count < 4;pulse_count++) {
  int bit_count =0;
  irsend.sendRaw(radio_preamble_b,3,40);
  for (bit_count=0;bit_count < 33;bit_count++) {
   if (heating_code_first[bit_count] == 1) {
   irsend.sendRaw(digitalOne,4,40);
   } else {
   irsend.sendRaw(digitalZero,4,40);
  }
 }

  delay(28);//Big delay between two pulses.
  irsend.sendRaw(radio_preamble_a,3,40);
  for (bit_count=0;bit_count < 33;bit_count++) {
   if (heating_code_first[bit_count] == 0) {
   irsend.sendRaw(digitalOne,4,40);
   } else {
   irsend.sendRaw(digitalZero,4,40);
   }
  }
 delay(15);
 }

 //Serial.println("Done");
 }

//delay(2000);
serialEvent();
}//close main loop

void serialEvent() {
 while (Serial.available()) {
 // get the new byte:
 char inChar = (char)Serial.read();
 // add it to the inputString:
 inputString += inChar;
 // if the incoming character is a newline, set a flag
 // so the main loop can do something about it:
   if (inChar == '\n') {
   stringComplete = true;
   }
  }
 }